
Start With the Display and Storage Brief
A classic display cabinet should solve a real living-room storage problem before decorative details are added. List the glassware, books, ornaments, family photographs, serving items and everyday clutter that need a place. Decide which pieces deserve illuminated glass display, which can sit in an open niche and which should stay behind solid lower doors or drawers.
Measure the available wall, ceiling, skirting, sockets, switches and the walking route beside the sofa or dining table. In a compact HDB, a deep cabinet can narrow circulation even when it looks elegant in an elevation. Mark the proposed depth on the floor and open nearby doors before approving the layout.
Ask for a dimensioned front elevation showing every arch, shelf, drawer and door. A balanced facade usually comes from aligning the display zones with the room and stored objects rather than dividing the wall into many small compartments. Keep a dated inventory and drawing so the quotation reflects the cabinet you actually need.
- List display pieces and hidden storage
- Mark cabinet depth on the floor
- Approve a dimensioned elevation
Plan Arches and Classic Details Carefully
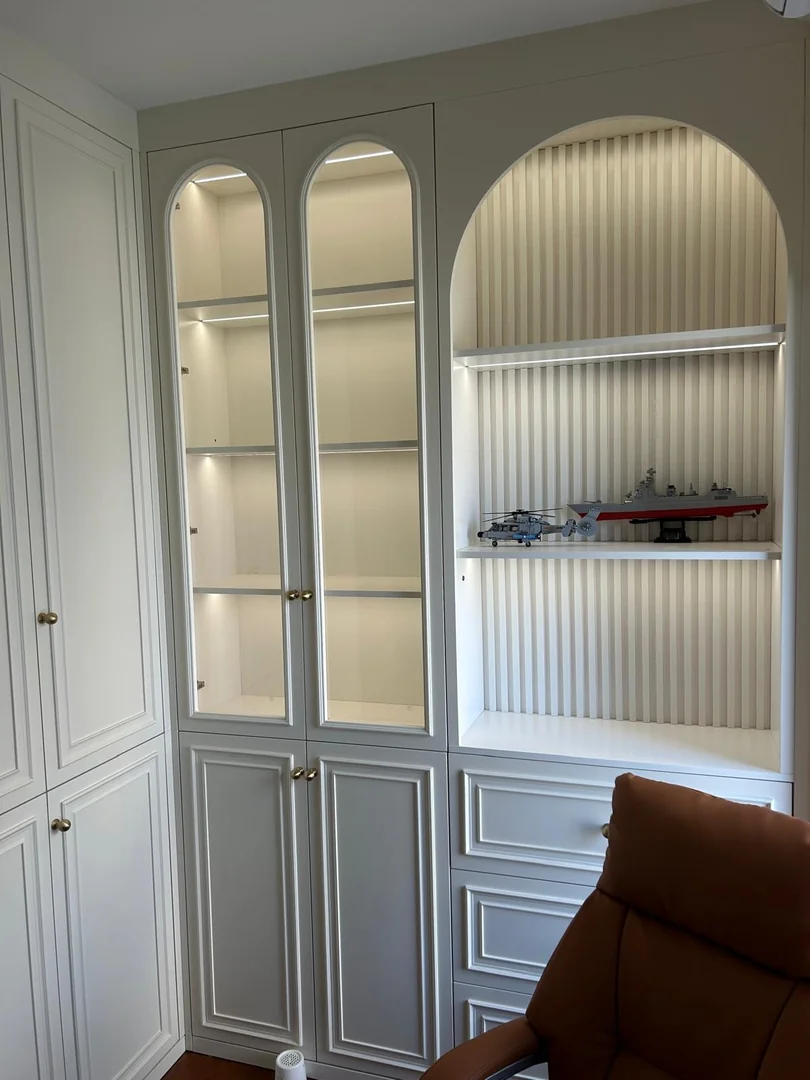
Arched glass doors and a central arched niche can create a softer, classic character, but the proportions need to suit the HDB wall. Confirm the arch height, width and radius on the drawing. A very shallow arch may read as accidental, while an oversized curve can leave awkward shelf space. Repeating one clear arch language normally looks calmer than mixing several curves.
Shaker-style frames, fluted backing, mouldings and brass-tone knobs add visual depth. Each detail also adds fabrication, joints and cleaning edges. Ask for close-up references and physical finish samples rather than relying only on a rendering. Record the panel profile, fluting direction, handle finish and visible edge treatment so the final cabinet is not based on broad labels such as classic white.
- Dimension each arch on the drawing
- Use one consistent detail language
- Approve profiles and hardware samples
Choose Glass, Shelves and Lighting as One System
Glass doors reduce dust while keeping display pieces visible. Confirm whether the glass is clear, fluted, tinted or another approved type, and ask how the door frame, hinges and catches will appear from the front. Shelf depth and spacing should follow the tallest and heaviest objects. Glass shelves need suitable thickness and support for the intended load; adjustable shelves can make future changes easier.
Integrated lighting should be planned before production. Agree on LED position, diffuser, colour temperature, switch location and cable concealment. Bright dots or reflections in glass can distract from the objects, so review the likely view from the sofa. The driver and connections must remain accessible for maintenance instead of being sealed behind permanent panels.
- Match shelf size to real objects
- Check reflections from the seating area
- Keep LED drivers serviceable
Balance Open Display With Closed Storage
A living-room cabinet can quickly feel busy if every section is open or glazed. Reserve the most visible bays for a small edited collection and use lower solid doors or drawers for chargers, documents, serving items and household supplies. The illuminated niche can hold one larger feature object instead of becoming another crowded shelf.
Plan drawer heights and internal shelves around actual contents. Frequently used items should be reachable without a step stool, while seasonal pieces can sit higher. Check that doors and drawers can open without striking the sofa, dining chairs, curtains or another cabinet. Filler panels may be necessary beside uneven walls so framed doors open fully and the facade remains aligned.
- Limit open display zones
- Put daily items within easy reach
- Draw doors and drawers in the open position
Coordinate Colour With the Living Room
White and cream finishes can make a full-height display cabinet feel lighter, but undertones matter beside existing walls, flooring and curtains. Compare physical laminate or paint samples in daylight and under the room's evening lighting. A warm ivory may suit wood flooring and brass hardware, while a cooler white may sit better with grey finishes.
The fluted niche backing, cabinet interior and exposed shelves do not have to match every outer panel, but the combination should be recorded by material code. Consider how fingerprints, dust and minor marks will show on glossy or very dark surfaces. If the cabinet meets a TV console, sideboard or dining storage unit, align key heights and finishes so the room reads as one planned composition.
- View samples in the actual room
- Record every material code
- Align with nearby furniture heights
Keep Sockets, Walls and Installation Practical
Photograph all power points, data outlets and switches before the cabinet is designed. Lighting needs a planned power source and switching method, while any socket used for daily appliances should remain reachable. Do not hide electrical connections behind a fixed back panel without an agreed access solution. Electrical relocation should be identified separately and completed by the appropriate trade.
Final production dimensions should follow a site measurement after relevant wall and floor finishes are known. Uneven corners, skirting and ceiling lines may require fillers or scribed panels. For an HDB or condo, confirm lift access, protection, permitted working hours and the route for tall panels. Decide who handles wall touch-up, debris removal and final cleaning.
- Map sockets before design approval
- Measure after relevant finishes
- Confirm access and protection requirements
Compare Cost, Lead Time and Complete Scope
Price is affected by overall width and height, arch fabrication, framed doors, glass type, shelf quantity, drawers, fluted panels, lighting, hardware and site access. Electrical work, painting, wall repair and moving existing furniture may be separate. Compare written quotations against the same elevation and specification instead of only a per-foot rate.
The process normally includes an estimate, site measurement, drawing revisions, material approval, production, delivery and installation. Custom furniture may require around six weeks after final confirmation, subject to factory schedule, shipping and complexity. Allow time for lighting tests, door alignment and any agreed rectification rather than planning a major event immediately after the first installation day.
- Compare like-for-like specifications
- List excluded trade work
- Allow time for final adjustment
FAQ and What to Send for a Quote
Do glass display doors stop all dust? They reduce direct dust entry but seals, gaps and opening frequency still matter. Can an existing socket stay inside the cabinet? Only with a safe, accessible detail agreed for the project. Are arched cabinets suitable for a small HDB? They can be, when depth, proportions and open display are controlled rather than enlarged for decoration alone.
Send the HDB floor plan, full-wall photos, wall width and ceiling height, socket locations, nearby furniture dimensions, display-item measurements, preferred arch and door references, finish preferences and renovation schedule. Mark what must be visible and what should be hidden. WhatsApp Glee Deco & Furniture at +65 8742 6767 for a project-specific display cabinet quotation.
- Send full-wall and socket photos
- Measure important display objects
- WhatsApp +65 8742 6767 for a quote