
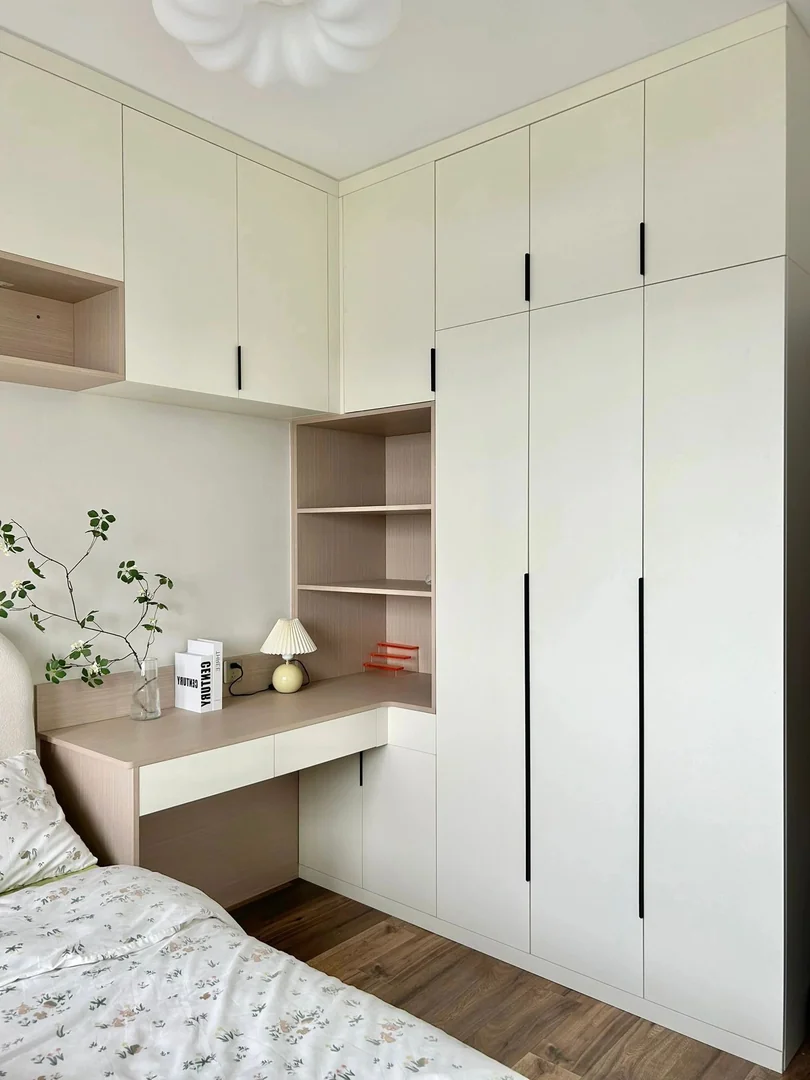
Start With the Bedroom Walking Route
A corner wardrobe and study desk can use two connected walls efficiently, but the layout should begin with movement rather than cabinet size. Mark the bed, bedroom door, window, air-conditioner, sockets and the route used every day. Keep enough space to stand at the wardrobe, pull out the desk chair and reach the window without moving furniture each time.
Measure the room after confirming the intended bed size. A queen bed, bedside table and chair can consume more clearance than expected in a compact HDB or BTO bedroom. Check whether the wardrobe return should stop before the desk, bridge above it or continue as a shallow cabinet. The best option depends on wall length, ceiling features and how the room will actually be used.
Photograph both walls from the doorway and window, then mark door swings, curtains and any floor skirting. A floor plan is useful for an early estimate, but final production dimensions should follow site measurement. Do not assume opposite walls are perfectly parallel or that every corner is exactly square.
- Mark the bed and chair movement
- Check doors, curtains and windows
- Confirm final dimensions on site
Divide Wardrobe Storage by Daily Use
Plan hanging, folded clothes, drawers and upper storage before deciding the door arrangement. Frequently used items should remain easy to reach, while luggage and seasonal bedding can go higher. A corner connection may create deep space that looks generous on paper but becomes difficult to access if shelves or doors are not planned around the user's reach.
Decide whether swing or sliding doors suit the available aisle. Swing doors provide a wider view of the interior but need clear opening space beside the bed and chair. Sliding doors save door-swing clearance but include overlapping panels and tracks that affect access. Show handles, internal drawers and open doors on the drawing so conflicts can be identified before production.
- List hanging and folded storage
- Review corner access
- Draw doors and drawers in open positions
Size the Study Desk Around Real Equipment
The desk should be planned around the laptop or monitor, keyboard, books and charging equipment that will remain on it. Confirm the proposed width, depth and finished height, then test the position of the chair relative to the bed. A shallow decorative counter may look neat in a rendering yet feel restrictive for a monitor stand or extended work sessions.
If drawers sit below the desk, check knee clearance and whether the chair can centre on the usable work area. Open shelves beside the wardrobe can hold books and small objects, but shelf depth should not project into the chair route. Leave practical access for cleaning below the desk and avoid creating narrow gaps that collect dust.
- Measure monitor and keyboard depth
- Protect knee and chair clearance
- Keep shelves outside the movement route
Coordinate Sockets, Data and Cable Access
Record every existing power point, data outlet and switch before the cabinet drawing is approved. Decide which points remain exposed and whether an electrician must relocate or add outlets. Cabinet installation should not permanently cover a socket, junction or access point that needs maintenance.
Plan cable openings large enough for plugs rather than only thin wires. A grommet, rear cable space or removable panel can keep chargers organised while allowing replacement later. If the desk includes a desktop computer, printer or several chargers, discuss ventilation and power demand with the appropriate trade instead of hiding all equipment inside a closed cabinet.
- Photograph every socket and switch
- Allow plug-sized cable openings
- Keep electrical access serviceable
Use Lighting Without Creating Screen Glare
Natural light is useful, but a desk facing or backing directly onto a bright window can create screen glare. Review the desk orientation at the times the room is normally used. Curtains, blinds and the monitor position may matter as much as the cabinet colour. A pale finish can help a compact corner feel brighter, while the wood-look desk surface adds contrast without requiring every panel to match.
For integrated task lighting, confirm the strip position, diffuser, colour temperature, switching and driver access before fabrication. The fitting should light the work surface without shining directly into the user's eyes. Decorative lighting does not replace adequate room lighting, and electrical work should be separately identified in the quotation.
- Check daylight and screen glare
- Specify task-light position
- Keep drivers and switches accessible
Choose Materials for a Singapore Bedroom
Ask for the exact board, laminate, edge treatment, hardware and internal finish rather than relying on a general colour description. Physical samples should be viewed beside the flooring, wall paint and bed fabric under the room lighting. Cream, white and light wood can make a built-in unit appear calmer, but undertones may shift under warm or cool lamps.
Discuss cleaning, ventilation and normal indoor humidity with the supplier. Avoid claims that any material is completely maintenance-free or unaffected by moisture. Wardrobe ventilation may depend on door gaps, room airflow and household habits. Heavy books or equipment also require suitable shelf spans and support.
- Record material and laminate codes
- Compare samples in the bedroom
- Match shelf support to stored items
Compare the Complete Cost and Timeline
Cost is affected by wardrobe length and height, corner construction, door type, internal drawers, hardware, desk size, shelves, lighting, material choice, access and installation details. Electrical work, painting, curtain changes, wall repair and furniture moving may be separate. Compare quotations using the same drawing and written scope rather than only a per-foot cabinet rate.
The usual process includes initial estimate, site measurement, layout revision, material and hardware approval, production, delivery and local installation. A typical custom-furniture lead time may be around six weeks after design confirmation and final dimensions, subject to factory schedule, shipping and project complexity. Confirm building access, lift protection and permitted working hours before fixing the installation date.
- Compare the same drawing and scope
- Identify excluded trade work
- Allow time for approvals and access booking
FAQ and What to Send for a Quote
Can a desk connect directly to the wardrobe? Yes, when the structure, door movement and work area are planned together. Is a corner wardrobe always more spacious? Not necessarily; usable access matters more than nominal depth. Should the wardrobe be installed before flooring? The sequence depends on the flooring and cabinet systems, so both parties should confirm their requirements.
Send the HDB floor plan, room measurements, wide photos of both walls, bed size, wardrobe storage list, desk equipment, socket positions, preferred colours and renovation schedule. Mark items to retain and explain whether the home is vacant or occupied. Glee Deco & Furniture can then prepare a clearer project-specific quotation. WhatsApp +65 8742 6767 with the plan and photos.
- Send the bed and equipment dimensions
- Include socket and window photos
- WhatsApp +65 8742 6767 for a quote