
Decide What Belongs in the Dry Pantry
A kitchen dry pantry can store packaged food, cups, serving pieces and small appliances away from the main cooking zone. Start with an inventory rather than a decorative elevation. Count frequently used drinks, snacks, breakfast items, bottles and appliances, then separate what should stay concealed from what is suitable for glass display. This determines the balance of doors, drawers, open counter and illuminated shelves.
Place daily items between comfortable waist and eye level. Heavy bottles and bulk food are easier to handle in lower storage, while occasional glassware can sit higher if it remains safely reachable. Avoid designing every compartment around one current container size. Adjustable shelves and a mix of drawer heights make the pantry easier to adapt when household shopping habits change.
- List food, tableware and appliances separately
- Keep daily items within easy reach
- Use adjustable storage where practical
Separate Display From Everyday Clutter
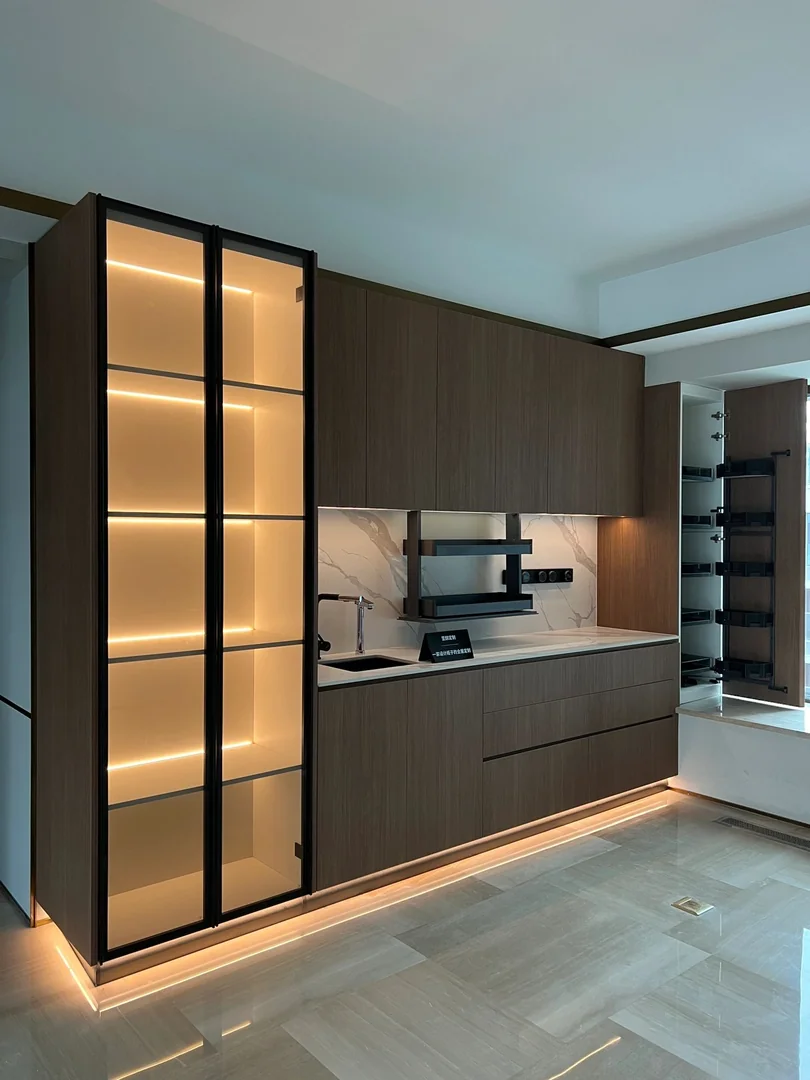
Glass doors work best for selected objects such as glasses, ceramics or serving pieces. They do not hide mismatched packets, cables or appliance accessories. Limit the display zone to items the household is willing to keep arranged, then provide closed storage nearby for refills and less attractive supplies. A narrow illuminated tower can create a feature without turning the whole pantry into a showcase.
Choose clear, fluted, tinted or framed glass only after considering visibility and cleaning. Dark frames and warm lighting can add contrast, while reflective glass may show fingerprints and nearby lights. Confirm shelf support and the intended load. If children use the kitchen, discuss the display height, door operation and placement of fragile objects rather than assuming glass belongs at floor level.
- Display only items that stay organised
- Provide closed storage for packets and accessories
- Confirm glass type, framing and shelf loads
Size the Coffee and Appliance Counter
Measure the coffee machine, kettle, toaster, blender or water dispenser with their lids, tanks and doors open. Leave hand space to refill water, remove trays and clean around each appliance. A machine that fits the niche width may still be unusable if its top lid hits the upper cabinet. Check the counter depth and whether appliances project into the walking route.
Group equipment by routine. Coffee cups and beans can sit close to the machine, while breakfast items may need a drawer below. Do not crowd every appliance onto one counter merely to keep the main kitchen worktop clear. Decide which items remain permanently connected and which are stored after use. The pantry counter should still have enough free surface for preparation and cleaning.
- Measure appliances in their open and refill positions
- Keep related supplies nearby
- Leave free counter space around equipment
Coordinate Sockets and Ventilation
Confirm the number, position and load requirements of appliances with the appropriate electrical trade before cabinet fabrication. Sockets should remain accessible without being directly behind bulky machines or inside an unsuitable enclosed space. Plan cable routes so cords do not cross a sink, hot surface or door opening. Electrical work should be clearly included or excluded from the furniture quotation.
Small appliances release heat and, in some cases, steam. Follow appliance instructions for clearance and ventilation rather than enclosing a machine because it fits. A coffee machine under a low cabinet may expose the underside to repeated steam when cups or tanks are filled. If equipment is stored behind pocket or hinged doors, confirm whether those doors must remain fully open during use.
- Confirm appliance power needs early
- Keep sockets and cables serviceable
- Follow appliance clearance and ventilation guidance
Plan Lighting Without Glare
Integrated lighting can make glass shelves readable and provide gentle counter illumination. Decide whether each light is decorative, task lighting or both. Warm light may suit dark wood and display glass, while neutral task lighting may show drink preparation more clearly. View samples with the cabinet finish because colour temperature changes how wood, metal and glass appear.
Agree on strip position, diffuser, switching, cable concealment and driver access before production. Bright points reflected in glass can create glare, and lighting installed too close to shelf edges may expose every cable. Drivers and switches should not be buried behind fixed panels. Ask how a failed strip can be replaced without dismantling the entire cabinet.
- Define decorative and task lighting separately
- Check reflections in the chosen glass
- Keep drivers and strips replaceable
Fit the Pantry Into the Kitchen Route
A tall display cabinet or dry pantry should not narrow the entrance or block the fridge, oven or service-yard route. Draw the cabinet depth, open doors and drawer projection together with the dining table and main kitchen cabinets. Rounded ends or a shallow display section may help where the pantry faces an open living area, but curves and special panels affect fabrication and cost.
If the pantry sits outside the wet kitchen, coordinate its finish with nearby dining and living furniture. It can share a wood tone or handle detail without matching every cabinet exactly. Keep cleaning access at the floor and around side panels. Very narrow exposed gaps collect dust, while an oversized filler can look heavy. Final dimensions should follow site measurement.
- Protect the kitchen and dining walking route
- Check all doors and drawers open fully
- Coordinate finishes with adjacent rooms
Understand Materials, Cost and Lead Time
Cost depends on cabinet height and width, internal shelves, drawers, glass type, metal frames, lighting, curved details, worktop, hardware and installation conditions. An illuminated glass tower usually costs more than simple laminate doors because it adds glass, framing, wiring and finished interiors. Compare quotations using the same dimensions and internal arrangement.
The process normally includes layout approval, site measurement, appliance confirmation, material selection, fabrication, delivery and local installation. Record exact laminate, glass and lighting choices before production. Late changes to a coffee machine, socket or display width may affect shelves and panels. Ask what happens if a selected finish or glass specification becomes unavailable.
- Compare identical glass, lighting and storage scope
- Record appliance and electrical exclusions
- Approve material codes before fabrication
FAQ and What to Send for a Pantry Quote
Should every pantry use glass doors? No. Glass suits selected display items, while daily supplies usually benefit from closed storage. Can a coffee machine sit inside a cabinet? Only when the appliance instructions, clearance, ventilation, access and electrical arrangement support the proposed use. Is lighting necessary? No. It is optional and should have a clear function and serviceable components.
Send the floor plan, photos of the proposed wall and walking route, ceiling height, appliance models, socket positions, pantry inventory, glass preference and inspiration images. Mark what should be displayed and what must be concealed. Glee Deco & Furniture can then discuss a practical pantry layout for an HDB, BTO or condo. WhatsApp +65 8742 6767 for a quotation.
- Send wall photos and appliance dimensions
- List display and concealed-storage needs
- WhatsApp +65 8742 6767 for a custom quote